REVIEW · MANASLU CIRCUIT TREKS FROM KATHMANDU
10 Days Manaslu Circuit Trek in Larke La Pass
Larke La Pass is the reason to pick this trek. What makes this one feel extra worth it is the combination of a classic Manaslu Circuit route with a true high-pass summit, topped off by practical safety tools like twice-daily oxygen monitoring. Larke La Pass (5,160 m) and the steady, guided rhythm through Gurung villages and big Himalayan scenery make it a standout plan for anyone chasing a real challenge.
I also like how the trip is set up for less stress on logistics. You get shared lodge stays, most of your meals, and an included licensed guide plus a porter system, so you can focus on pacing and enjoying the trail instead of sorting details. The main consideration is the altitude effort itself, especially with the longest walking day before the pass and the thin-air conditions around the summit approach.
Key highlights that matter on the Manaslu Circuit

- Twice-daily oximeter checks for pulse, oxygen saturation, and heart rate, plus a medical kit on hand
- ACAP, MCAP, and restricted area permits handled for you
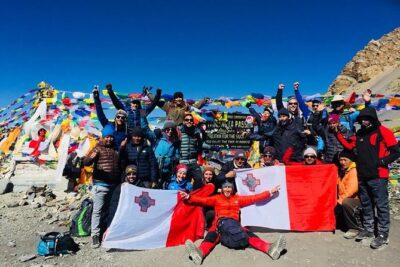
- Larke La Pass at 5,160 meters, the big goal that reshapes the whole itinerary
- Tea house lodging included, typically shared with other trekkers
- Guide plus porter support (1 porter for every 2 trekkers) to keep your load manageable
- Small group size (up to 20 travelers) for a more controlled, easier experience
Larke La Pass at 5,160 m: the big day and why it’s worth preparing for

If you’re doing the Manaslu Circuit, you’re probably already chasing big views and a remote-feeling route. What makes this 10-day version special is how clearly it points to the high drama of Larke La Pass at 5,160 meters. That number matters because it changes the whole day, from the way you pace in the cold to how carefully you watch how you breathe.
On high passes, the goal is not to race. It’s to keep steady effort, avoid gasping, and save energy for the crossing and the descent. The good news here is that safety support is built in, including an oximeter used twice daily to check pulse, oxygen saturation, and heart rate. That doesn’t remove the challenge, but it does help you and your team make smart decisions early, rather than guessing how your body is doing.
You also get acclimatization time built into the overall plan, so you are not jumping straight from low elevations to pass height. That makes a real difference for comfort and confidence as you climb.
You can also read our reviews of more hiking tours in Kathmandu
The trail rhythm: your 10 days from Machha Khola to Besisahar

This trek is built around a mix of river valleys, village days, and gradual altitude gains, with a longer push before you head toward the pass. You’ll spend most days walking roughly 5 to 9 hours, and the timing is designed to give you enough daylight on the trail while still leaving you time to settle in at tea houses.
Here’s the day-by-day flow in plain terms, with what’s special and what to watch for.
Day 1: Kathmandu to Machha Khola, then your first trekking night
You start with a scenic drive out of Kathmandu to Machha Khola, about 8 to 9 hours. For many people, that long first day is the price of admission for getting into the trek corridor quickly.
Practical tip: hydrate and take it easy the first evening. Even though it’s mostly travel, your body is adjusting, and your next day is a real walking start.
Day 2: Machha Khola to Jagat, Gurung villages along the Budi Gandaki
Day two is a trek of about 6 hours from Machha Khola to Jagat. You’ll walk along the Budi Gandaki River and pass through Gurung villages, including lower parts of communities like the ones around this route.
What I like about this kind of day is that it reminds you this is not only a hiking route. It’s a lived-in valley. You get chances to see village life and learn how people survive near the trail.
What to consider: village paths can be a little uneven or stop-and-start as you move through settlements, so keep your pace calm and steady.
Day 3: Jagat to Deng via Philim area
You move from Jagat to Deng in about 6 to 7 hours. Along the way, the terrain keeps things interesting, with river crossings and segments that lead toward Philim.
This day is often the “settling in” phase. By now your trekking legs are finding their rhythm, and you can start feeling the gradual lift in elevation and the cooler air.
Day 4: Deng to Namrung, suspension bridge plus a climb up
Day four runs about 7 to 8 hours, from Deng to Namrung. The route includes a suspension bridge and then an ascent toward areas like Rana and Bihi Phedi.
Bridges are not just scenery. They’re also a mental checkpoint. If you cross confidently and keep your breathing steady, you’ll feel prepared for the longer, more serious segments coming next.
What to watch for: suspension bridges can be bouncy, and your footing needs attention. Slow down and keep a light grip.
Day 5: Namrung to Samagaun, long-ish distance, big altitude energy
You trek from Namrung to Sama Gaon (Samagaun), about 6 to 7 hours over roughly 15.5 km (9.63 miles). This is one of the more active legs, so it helps to start early in the day.
This is where the trek starts feeling more “Himalayan.” The air tends to feel thinner, and the day has that slow-building anticipation of approaching the higher zones.
Day 6: Acclimatization day in Samagaun, choose your altitude option
Day six is a deliberate acclimatization day in Sama Gaon, and it’s one of the most valuable parts of the whole schedule. You get two option-style day trips:
- Pungyen Gompa, east of the Nubri Valley
- Manaslu Base Camp area
Even if you’re not trying to go hard, the purpose is to help your body adjust while still moving. That’s the smart trade: you gain experience at altitude without overloading recovery.
What to consider: choose the option that matches your energy. Accumulating fatigue on this day can backfire later.
Day 7: Samagaun to Dharamsala, yaks and high-altitude calm
You move from Sama Gaon to Dharamsala in about 6 to 7 hours. The trail enters terrain associated with yaks, and the route feels more open as you gain height.
This is a good day to practice your pass-eve habits: regular hydration, small snacks, warm layers. The goal is to show up to the next day feeling controlled, not wrecked.
Day 8: Dharamsala to Bhimtang, the longest walk before the pass
Day eight is the longest trek day, about 8 to 9 hours, from Dharamsala to Bhimtang. This leg sets up your approach toward the pass area near Larke La.
If you want to enjoy the later sections, this is where you make your best decisions. Start steady, don’t try to “win” the day, and treat every stop as a chance to catch your breath.
What to watch for: when a day is longer, it’s easy to burn energy early. Keep your effort consistent.
Day 9: Bhimtang to Dharapani, descent through Karche
You trek about 8 hours from Bhimtang to Dharapani. The trail gradually descends through Karche, and the surroundings open up as you move toward the lower end of the route.
This kind of day can feel like relief because you’re dropping altitude. Still, descent is hard on knees, ankles, and calves. Take it slow, especially on rough steps.
Day 10: Dharapani to Besisahar, then drive onward to Kathmandu
Your final trekking movement is short, about 1 hour from Dharapani to Besisahar. Then you continue by vehicle with a scenic drive taking about 8 to 9 hours back toward Kathmandu, with an option to continue onward to Pokhara depending on your travel plan.
This end-phase is great for debriefing. You can finally stretch, warm up, and process what you did, without another day of trail stress.
What’s included, and how that affects your real day-to-day experience
The included package is built around three big comfort goals: fewer planning headaches, less carrying, and better safety structure.
Permits and restricted area access are handled
You get all necessary permits, including ACAP, MCAP, and restricted-area entry permits. That matters because getting this right is not optional on routes like this. Having it handled also reduces delays and paperwork chaos.
Tea houses and shared lodging keep you moving
Accommodations are in trekking lodges, commonly called tea houses, shared with other trekkers. That means you trade private space for convenience and warmth from the group rhythm.
The practical upside is simple: you’re not chasing hotels mid-trek. You’re living the route the way the trail system works.
Most meals are covered, so you can plan your energy
You get breakfast (10), lunch (9), and dinner (9) included. That’s a big deal on a high-altitude trek because consistent food at consistent times helps you keep your strength.
Still, your snacks, personal treats, and drinks are not part of the included plan, and that can add up. Alcohol and non-alcoholic drinks are listed as not included.
Guide and porter support is the heart of the value
You’ll have a government licensed guide with salary plus food, drinks, accommodation, transport, and insurance included. You’ll also have a porter system: 1 porter for every 2 trekkers, and the porter’s food, accommodation, transport, insurance, and salary are included.
This matters because it changes what you carry. Less load often means more stable breathing and better energy on the steep parts.
Safety and altitude support: the oximeter and the smart safety net

High-altitude trekking is never a guarantee. But you can choose a plan that pays attention early.
This trek includes:
- a medical kit with a first aid kit
- an oximeter to monitor pulse, oxygen saturation, and heart rate twice daily
- severe case evacuation management
- accident insurance for staff
That combination helps you avoid the most common mistake on treks. People delay decisions because they feel fine at first, then symptoms creep in. A twice-daily check gives objective data to guide discussions.
I also appreciate the structure around responsible tourism and safety emphasis in the overall plan. On routes like the Manaslu Circuit, the difference between a good trek and a stressful trek is often communication and early action.
The people behind the scenes: guides named Narayan Ntc and Gopal

A trek lives or dies by the guide relationship. The strongest praise here centers on guides who pay attention to the group’s pace and motivation.
I saw specific names in the feedback: Narayan Ntc as a guide, with Naresh providing coordination support in Kathmandu. Another guide mentioned is Gopal. Both were described as helpful and dependable, and a key theme was support that respects your fitness level, not just a push to hit targets.
That’s what you want. Your guide should be able to explain what you’re doing each day and adjust when reality hits, like road or weather issues. Even if you’re mentally ready for the route, conditions can shift, and organization helps you keep confidence.
Value for $1,049: what you’re really paying for

At $1,049 per person, this trek is priced like a guided, permit-supported expedition, not a bare-bones hike.
Here’s what you’re getting for that money:
- trekking lodge accommodation in shared rooms
- all required permits (ACAP, MCAP, restricted area entry)
- shared vehicle transportation from Kathmandu to Machha Khola and back after the trek
- government licensed guide plus a porter (1 for 2 trekkers)
- breakfast, lunch, dinner for most days
- oximeter and medical kit
- trekking map, trekking hat, duffel bag, and a trip achievement certificate
- severe evacuation management
What’s not included (important for budgeting):
- Nepal entry visa fee ($15 to $125)
- personal expenses
- battery charging, internet, and hot shower
- alcoholic and non-alcoholic drinks
- tipping for guide, porter, and driver
- private transportation
So the real question is: do you want to handle permits, staffing, meals, and daily safety support yourself? If not, this price makes sense because it covers the stuff that usually costs time, money, and stress.
If you already have a tight budget, the biggest swing factors are likely tipping, drinks, and anything charging related.
Who this trek suits best, and who should think twice

This trek is clearly aimed at people with moderate physical fitness who want a guided high-pass trek with support.
It suits you if:
- you want the Manaslu Circuit experience with a clear big objective, Larke La Pass
- you prefer small-group structure (maximum 20 travelers)
- you value safety tools like an oximeter and a medical kit
- you like the idea of shared tea houses and included meals
Think twice if:
- you have limited altitude tolerance or any medical concerns where you need a more specialized plan
- you hate basic lodging (tea houses mean shared, simple setups)
- you strongly rely on hot showers or charging and don’t want to manage that separately
What to expect on the ground: pacing, weather reality, and comfort trade-offs

Even when a schedule looks clean on paper, mountains do what mountains do. The better-run treks are the ones where your guide stays flexible and keeps the group moving safely.
You can also expect a classic rhythm:
- early starts on trekking days
- afternoons for food, rest, and acclimatization choices
- cold nights as you rise in elevation, especially heading toward the pass
One comfort note from the package: hot shower and charging are not included. That means your routine is more basic than in city life. Plan for that mentally, then you’ll enjoy the simplicity.
Should you book this Manaslu Circuit trek with Larke La Pass?
Book it if you want a structured, supported Manaslu Circuit trek that doesn’t treat safety as an afterthought. The combination of permits handled, guide and porter support, included meals, tea house lodging, and twice-daily oximeter monitoring is exactly what you want when you’re aiming for a high pass at 5,160 meters.
Don’t book it if you’re mainly looking for luxury or if you’re not ready for a demanding multi-day hike with cold, shared lodging, and a long walk before the pass.
If you’re deciding right now, my practical advice is this: pick it if you value preparation and a steady pace over improvising. This kind of route is where good support turns a difficult goal into a rewarding story you can tell for years.
FAQ
How high is Larke La Pass on this trek?
Larke La Pass is listed at 5,160 meters.
How many days is the trek, and what is the approximate duration?
The trek is described as 10 days, with an approximate duration of 10 days.
What permits are included for the Manaslu Circuit route?
The included permits include ACAP, MCAP, and restricted area entry permits.
Are accommodations and meals included?
Yes. You get accommodations in trekking lodges (tea houses), and meals include breakfast for 10 days, lunch for 9 days, and dinner for 9 days.
Is a guide and porter included?
Yes. A government licensed guide is included, and there is a porter included with a ratio of 1 porter for every 2 trekkers.
What safety and medical support is included?
The tour includes access to a medical kit with a first aid kit, and an oximeter is included to monitor pulse, oxygen saturation, and heart rate twice daily.
What is not included in the price?
Not included are the Nepal entry visa fee, private transportation, personal expenses, alcoholic and non-alcoholic drinks, battery charging, internet, hot shower, and tipping for the guide, porter, and driver.
More Hiking & Trekking Tours in Kathmandu
More Tour Reviews in Kathmandu
Not for you? Here's more nearby things to do in Kathmandu we have reviewed
Manaslu Circuit Treks from Kathmandu, compared.
★ 5.0Manaslu Circuit Trek (15 Days)From $1,65750 reviews
★ 5.016 Day Private Manaslu Circuit Trek from KathmanduFrom $1,13542 reviews
★ 5.0Manaslu Circuit Trek 13 DaysFrom $1,40030 reviews
★ 5.0Manaslu Circuit Trek 8th Highest in the WorldFrom $1,60014 reviews
Browse the lists this tour appears in